Feeds:
Posts
Comments

Archive for the ‘gardening’ Category

About this time last year I transplanted a redbud tree from one location in my yard to another. At first, the transplant process appeared to be a success. The tree put forth some pretty little flowers followed by some leaves. Eventually, however, the leaves all dropped. I called the “Master Gardeners” at our local botanical gardens and they said I shouldn’t give up hope; the tree might just be in shock from having been transplanted. Sure enough, a short time later the tree sprouted new leaves on new branches (the leaves on the old branches never came back). But then the deer ate the new leaves. That brave redbud put forth more leaves, but the deer got them too. Autumn came and I just crossed my fingers that the little redbud tree would come back the following spring.

Well, spring is officially here and that redbud is officially dead.

I’m beginning to feel that this is “oops” week at the ol’ Yikes Money house between the dead redbud and the disastrous pesto project.

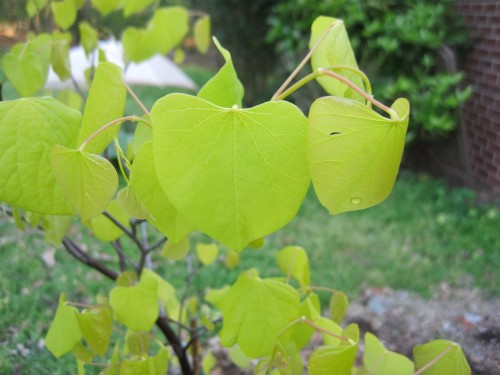
Anyhow, Mark and I knew we wanted to replace the redbud with another tree, so we shopped around and after considering lots of options, we bought another redbud. This may seem unimaginative, but the new redbud is a little bit special. It’s called ‘Hearts of Gold’ and its leaves are a fantastic chartreuse color.

This little tree with its unexpected leaf color just seems to pop. I love it.

We even got the tree on sale. Well, sort of. A local nursery was offering 50% off select trees and this redbud was included in the sale. Unfortunately, however, Charlie and I went together to buy the tree and somehow in the process of hauling the tree across the nursery and endeavoring to pay for it while ensuring that Charlie didn’t destroy every other plant in sight, I got overcharged. I paid full-price and didn’t realize it until I got home. One email and three phone calls later, I got it all sorted out and the manager of the nursery has promised to send me a check for the difference.

So what about you? Are you thrilled with something you’ve planted recently?

Read Full Post »

My front yard is littered with pine trees.

I’ve never liked them; they make the front yard feel almost claustrophobic. When Mark and I first moved to this house, we talked about removing the pine trees, but then we found out how much it costs to remove just a single tree and that dreamed quickly faded. Also, somehow it seems wrong to remove a bunch of trees (all of which are probably older than either of us and have certainly lived on this property longer) simply because they don’t suit our tastes. Regardless of the reason, the pine trees are here to stay.

I have noticed one small financial benefit of the pine trees: they drop their needles periodically all over our driveway which makes them easy to sweep up. Then I can use them as mulch.

Pine straw is actually a fantastic mulch: it breaks down slowly so you don’t have to replace it frequently; it’s lightweight and easy to apply; it doesn’t attract termites the way wood mulch can; and it provides nutrients to the soil. In fact, many people pay good money for what we’re getting for free.

It seems to me that between collecting my own mulch and making my own compost, pretty soon I’m going to be – to quote my dear friend’s brother – “the kind of girl you could hook a plow up to and be proud of.”

Now I have to go find my Birkenstocks.

Read Full Post »

Few money saving ideas excite me more than growing my own plants from plants I already have. And that’s exactly what I’ve been doing with my basil, gardenia, and Christmas cactus plants.

Cloned Plant #1: Basil

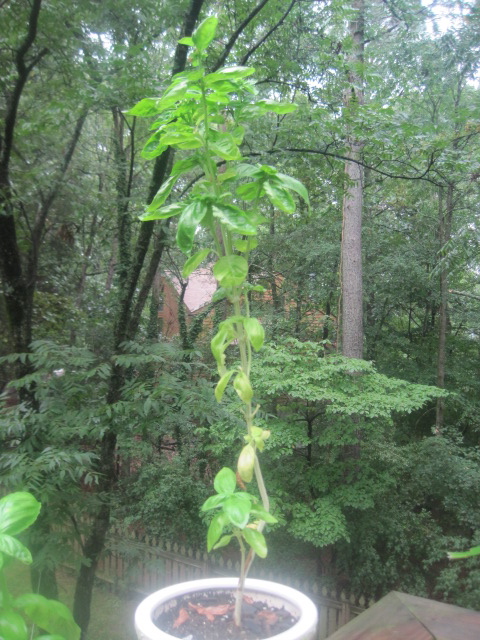
About six weeks ago I highlighted a post by Gayla Trail that described how to propagate herbs. Shortly after that, I followed Gayla’s instructions to clone my basil plant. I clipped off a couple of small branches, removed the lower leaves, and put them in water. After a couple of weeks they’d sprouted roots, so I planted them in some potting soil in a pot on my deck. And now I have two additional healthy basil plants growing happily. Here’s a picture of my first basil plant (which is actually not looking too healthy after our long, hot summer):

And here are this plant’s thriving clones:

Pretty cool, right?

Cloned Plant #2: Gardenia

Buoyed by my success with the basil, I moved on to our gardenia bushes. I wrote a post about cloning our gardenias. I used the same technique I used to clone the basil. After about 2-3 weeks, I’m happy to report that my mini gardenias have some healthy roots growing. Here’s a photo from the end of July of one of the newly clipped gardenia cuttings:

I put the cuttings in a cup of water on my kitchen windowsill:

And now my cuttings have grown some great looking roots:

I’ll give them another week in the cup of water and then I’ll transfer them to their own pots with some soil.

Cloned Plant #3: Christmas Cactus

And, last but not least, I got a little dizzy with the excitement of cloning plants. Two weeks ago I spied my sad looking Christmas cactus and broke off a couple of pieces to put in water. I had no idea what would happen, but I figured I wouldn’t miss a couple of spikes from the cactus. Here’s the not particularly attractive original plant:

The pieces of Christmas cactus have been hanging out in their own cup of water on my kitchen windowsill. Triumph of all triumphs, they, too, have developed some good looking roots:

I’ll try transferring them, along with the gardenia cuttings, to their own pots with soil next week.

I’m becoming a little cloning addict. Do you have any recommendations for other plants that I can easily clone? I’m ready!

Read Full Post »

In our backyard, we have two gardenias (I wrote about them several weeks ago when I clipped some of their flowers for a yard bouquet). Rooting cuttings from gardenias is surprisingly easy and the summer months are a great time to take clippings. Here’s how to do it the easiest way imaginable.

Cut off the tip of a branch, including about 4-5 inches of stem:

Remove all but the top leaves from the stem:

Repeat this process as many times as you’d like. I took about six cuttings.

Bring the cuttings inside and put them in a glass of water in a bright window (out of direct sunlight).

Now I have six potential baby gardenias decorating my kitchen window sill. They’ll start to grow roots over the next couple of weeks.

Once the cuttings have developed a fair amount of roots, I’ll put them in small pots in a little potting soil. I’ve read that it is not a good idea to try to plant newly rooted cuttings outside in the fall — they aren’t likely to survive over winter — so I’ll keep them inside until next spring. That said, since I’ve taken several cuttings, I may try one outside just to see what happens.

Last summer, I took two cuttings from our gardenias. While both rooted for me in water, I managed to eventually kill them. I transferred them to some potting soil to keep inside over the winter and, throughout the winter, I watered them about once a week or whenever the soil seemed to just get dry. But as spring approached and they started to show signs of growth, I got a little over-excited and started to water them excessively. Bad idea.

I think rooted baby gardenias planted temporarily in small, festive pots would make fabulous (and very inexpensive) holiday gifts for friends and coworkers. Don’t you?

Read Full Post »

I have discovered how to make flowers bloom.

I recently lamented about our five crape myrtle trees — year after year they have failed to bloom. They have even perplexed our local master gardeners whom we called for advice. Well, a day or two after I wrote about my disappointment in the trees on this blog, they started blooming. While they’re not blooming magnificently, they are blooming far more than they’ve done in all the years we’ve lived here.

So put down your expensive fertilizers. Don’t worry about compost or mulch. Forget about sunlight and water needs. Figure out ways to publicly humiliate your plants and then see what wonders they’re capable of.

Read Full Post »

Amaryllis plants are ubiquitous during the winter holidays because it’s easy to force the bulbs to produce their huge red flowers indoors. Our neighbor Jim gave us an amaryllis as a Christmas gift in 2007. He told us that after it was finished blooming indoors, we could plant the bulb outside in early spring. We did and promptly forgot about it. Much to our surprise, the following spring — 2009 — it bloomed. And now it’s blooming again and it’s even bigger than it was last spring.

The really great thing about this plant is that everyone is used to seeing these amaryllis flowers indoors, in a pot, at Christmas time. So now our amaryllis is a conversation piece with our neighbors. Several people have stopped to ask us if that’s really an amaryllis, outside, blooming in May.

So the next time someone gives you an amaryllis during the holidays, don’t throw it out after it has finished blooming. Instead, start thinking about where in your yard you can plant it in the spring. You’ll finally have something to talk about with your neighbors.

Read Full Post »

I recently turned an unused part of my backyard into a small vegetable garden. Then my dogs discovered it and now I don’t have a small vegetable garden in my backyard. It turns out that freshly turned earth = doggies’ playground. Though I can’t benefit from my backyard vegetable garden, maybe you can create a successful one. Here are the steps I took:

Step 1. Choose an appropriate space. This may not be as easy as it sounds. Ideally, your garden should get at least six hours of full sun a day. I had a vegetable garden last summer in a nice sunny spot, but the deer got to it and ate all my vegetable plants down to the ground. I didn’t eat a single vegetable from the garden. So this time, I decided to put my vegetable garden in my fenced-in backyard (even though it doesn’t quite get full sun) to ensure that the deer didn’t get to it. As you now know, the deer didn’t touch it; the dogs did. Anyhow, here’s the spot before I did any work:

Step 2. Clear the space of any weeds.

Step 3. Dig the bed’s soil to at least six inches deep. Be careful where you dig. Our town offers a service where you can call to report that you’re going to be doing some digging in your yard and they’ll contact the appropriate utilities companies to come out and mark underground wires and pipes. I did not do this and, as a result, had my typical, “Woman, you’re a fool” gardening moment when I realized that I dug up my phone line. Fortunately, I didn’t do any damage. However, this was a stupid move since the placement of the phone line shouldn’t exactly have been a surprise given that when I dug it up I looked up and saw this:

That's the phone box off to the left.

Step 4. Amend the soil. Our soil here is very heavy clay. When I dig it, it comes up in chunks. A plant would need to have freakishly strong roots to get through this soil. So in order to make the soil looser and give it some nutrients, I added a wheelbarrow full of compost mixed with leaf mold and dug it into the soil in the vegetable bed.

Leaf mold is a fancy term for shredded leaves that have been decomposing in my driveway for quite some time. Our town offers curbside pick-up of leaves in the fall. If you call ahead of time, they will also drop off a huge pile of leaves that have been shredded in their big machine. I did that in the fall of 2008 and I’m only now finishing the leaf pile. If your town doesn’t offer such a service, an easy alternative is to rake your leaves in the fall into big plastic bags. Tie them up and punch several holes in them with a screw driver. Leave them alone and in the spring they’ll be nicely decomposing. For bonus points, you could run your lawnmower over the leaves before you rake them and put them in the bag; the lawnmower will shred them for you which will speed up the decomposition process.

Step 5. After you amend the soil, wait a couple of weeks (if you’re patient). Waiting allows the soil to settle and attract nice earthworms. I am seldom patient and since I had already had the vegetables that I wanted to plant, I just went ahead and added them. Had I waited, I would have seen that my dogs wanted to dig up the earth and might have reconsidered planting my vegetables there. Ah, hindsight.

Step 6. Dig a hole twice as wide as the root ball and as deep as the vegetable plant was in its container. The vegetable plant should sit evenly with the surrounding soil. Place the plant in the hole and fill in with the soil. Press down firmly on the surrounding soil. Continue with the rest of the plants in the same manner. Water thoroughly.
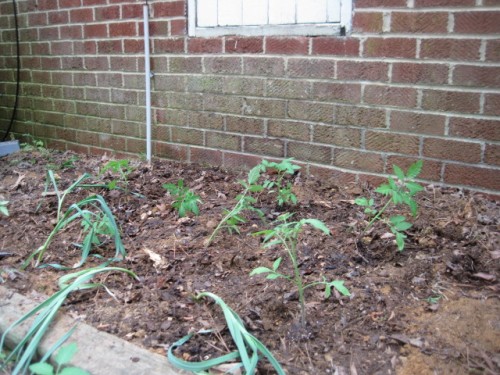
Lovely while it lasted

I planted tomatoes as well as some leeks that my neighbor Kirsten gave me. The vegetable garden looked pretty good. My dogs thought so too. Truth be told, I suspect it was just one of my dogs who dug up my garden, but I won’t name names. All I can say is this particular dog is awfully lucky I have a little thing called unconditional love for her.

See how she's all playful and happy after digging in my garden?

Fortunately, I was able to salvage most of the vegetable plants. Now I just have to decide what to do with them. Should I brave the deer and plant them in the sunny, unprotected part of my yard, or should my new vegetable garden look something like this:

Two brave tomato plants

Decisions, decisions.

Read Full Post »

It has been hot and dry here. I can’t remember the last time it rained and, with the exception of the past few days, the temperature has hit the upper 80s for most of the last few weeks. Consequently, I’m currently loving the few plants in our yard that seem to be thriving despite the weather. At the top of that list: yarrow and Confederate jasmine. In addition to their hardiness, yarrow and Confederate jasmine are both avoided by deer and rabbits. Perfect.

Yarrow comes in all kinds of varieties and colors (all in the Achillea family). The plants grow in poor soil and are happy even if neglected. They also spread fairly easily. When we moved in, we had one very small yellow yarrow plant. Now we have about four.

The leaves are a very pretty greenish gray and the yellow flowers are delicate and flat.

The yellow is so bright that at dusk it almost seems to glow.

The other plant that is thriving despite the weather and my neglect is Confederate Jasmine (Trachelospermum jasminoides). When we lived in Los Angeles, this vine seemed to grow almost like a weed — it was everywhere — and when it was in bloom, it turned city streets into scented oases. Confederate jasmine was in bloom in Southern California when I fell in love with Mark and the scent will always remind me of that incredible giddy joy that new love brings. When we moved here to North Carolina, jasmine was the first thing I planted. I bought two quart-size plants for about $8 each and put them along our backyard fence. They don’t require any extra watering or fertilizing. I pretty much leave them alone. Now, five years later, those tiny plants look like this:

You can see in the photo that the grass by the gate is really struggling, but the jasmine plants are perfectly happy. They’re absolutely covered in white pinwheel blossoms that smell divine.

So for this week’s yard bouquet, I’m celebrating these two workhorse plants. They look a little goofy together in a vase, but I appreciate them nonetheless.

Read Full Post »

In the early spring of 2006, shortly before Charlie was born, Mark and I cleared out a neglected corner of our yard and made a garden bed in honor of Charlie’s upcoming arrival.

Later that spring I wanted to plant peonies in the new garden. I had carried peonies in our wedding and thought it would be lovely to have some in Charlie’s garden. Peonies at the nursery were quite expensive but I found a “good deal” online: five peonies for about $30. However, I didn’t notice the fine print — they wouldn’t be mailed until the fall and they came “bare root.” Bare root basically means what it implies: the peonies didn’t arrive as anything that resembled a plant, instead I got a bunch of brown spindly looking things that were, in fact, just bare roots.

The key to planting peonies is to plant them somewhat shallowly. If they’re planted too deep, they won’t bloom. To plant bare root peonies, dig quite a wide hole. Place the root in the hole with the 3-5 “eyes” (growth buds) pointing upward. Make sure not to plant the eyes of the root deeper than two inches below the surface of the garden bed.

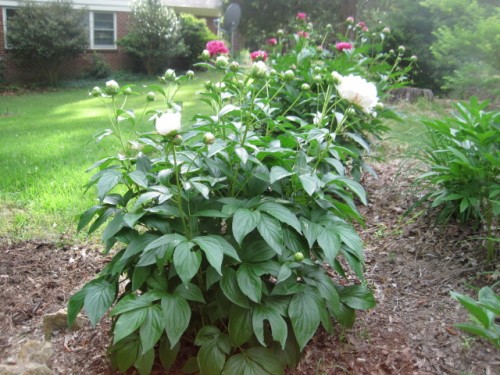
One of the disadvantages of planting bare root peonies is that they take several years to establish before they put forth any blooms. I planted mine in the fall of 2006. This is the first spring that the peonies have impressed me — normally I just get one or two blooms. And, truth be told, currently only two of the five peony plants are impressive; just a single bloom graces the other three.

When large groups of peonies are planted and in bloom they’re a real showstopper. I hope my five peonies become that someday.

Harmless ants frequently gather on the buds to collect nectar.

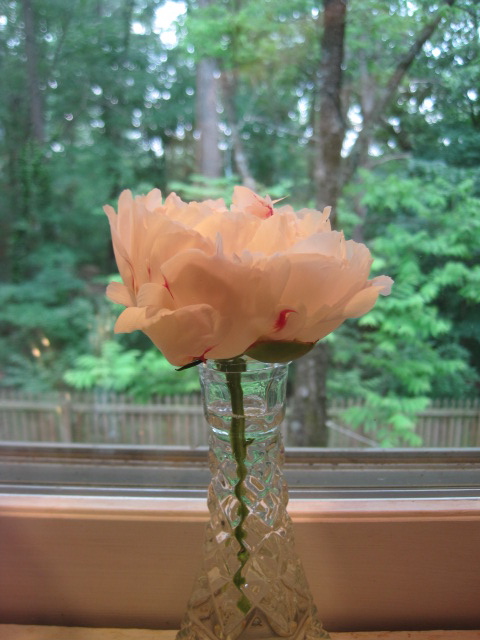
I wanted to cut a bunch of the flowers and bring them inside for a yard bouquet, but Mark asked me not to since he wanted the plant to be full of flowers. But I couldn’t resist bringing just one flower in the other day for our anniversary.

Read Full Post »

A couple of months ago I made my second compost bin by drilling holes in a circular trash can. My first bin, which I made late last summer, was a huge success and this spring I’ve been happily spreading the finished compost throughout our garden. But the second bin, well, this one had me worried. For one thing, it smelled bad. The more troubling problem though was that after two months not a single worm was in the bin. Not one. And I know that if you build a bin properly, the worms find it. No worms = you screwed up.

It was time to problem solve. A stinky bin plus no earthworms is a big sign that the bin is too wet and not draining properly. And, truth be told, when I made the second compost bin I basically knew that I hadn’t drilled enough holes in the bottom of the trash can. I only drilled four holes. I would have drilled more, but the plastic on the bottom of the trash can was really thick and, frankly, I’m lazy. Fortunately, the sides of the trash can were a lot easier to drill through so I made lots of holes in the sides.

Anyhow, last week I figured that I needed to drain my bin. In order to do so, I just turned it on its side and left it alone for a few days.

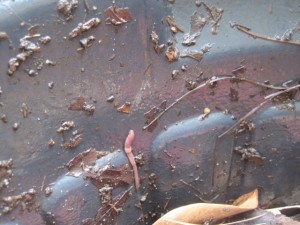
And when I came back to check on it, oh sweet mercy, the worms had come.

That little ringed section near one end of the earthworm is its clitellum which is part of its reproductive system. Reproduce, little worm, reproduce!

There aren’t many worms yet, but they’re there. I am in no way embarrassed to say that finding worms in my compost bin is one of the more exciting things that has happened to me recently.

As soon as I finish using the compost from the first bin, I’m going to transfer the second bin’s contents to the first bin. Then I’ll diligently drill lots more holes in the bottom of the second bin.

In the meantime, although there aren’t a lot of worms in the second bin, I trust they’ll call all their friends and tell them about the cool party in my bin. After all, I’m serving really great food.

Read Full Post »

Older Posts »